
TL;DR
Moving your rig out of your workspace into a closet or another room is often the most effective way to reduce noise. Proper placement, ventilation, and dampening materials make a closet setup both quiet and safe. Foam alone won’t solve all sound issues; understanding how sound travels and where to treat is key.
Imagine your AI rig roaring in a closet, while your workspace stays completely silent. It sounds like magic, but it’s actually just good sense. Most noise isn’t about how much foam you slap on the walls; it’s about where you put the rig and how far away it is from you. If you want to learn more about optimal placement, check out Acoustic Dampening, Placement, and the “Rig in the Closet” Setup. If you want a quiet, effective setup, you need to think beyond just absorbing sound—your best move might be putting the machine in another room altogether. This guide unpacks the real secrets to controlling noise, optimizing placement, and making your closet work for you, not against you.
Whether you’re running a high-powered inference rig or just trying to record vocals without disturbing the neighbors, understanding the difference between soundproofing and dampening can save you time, money, and frustration. Ready to turn your closet into a quiet, productive space? Let’s go.
Acoustic dampening
& the rig in the closet.
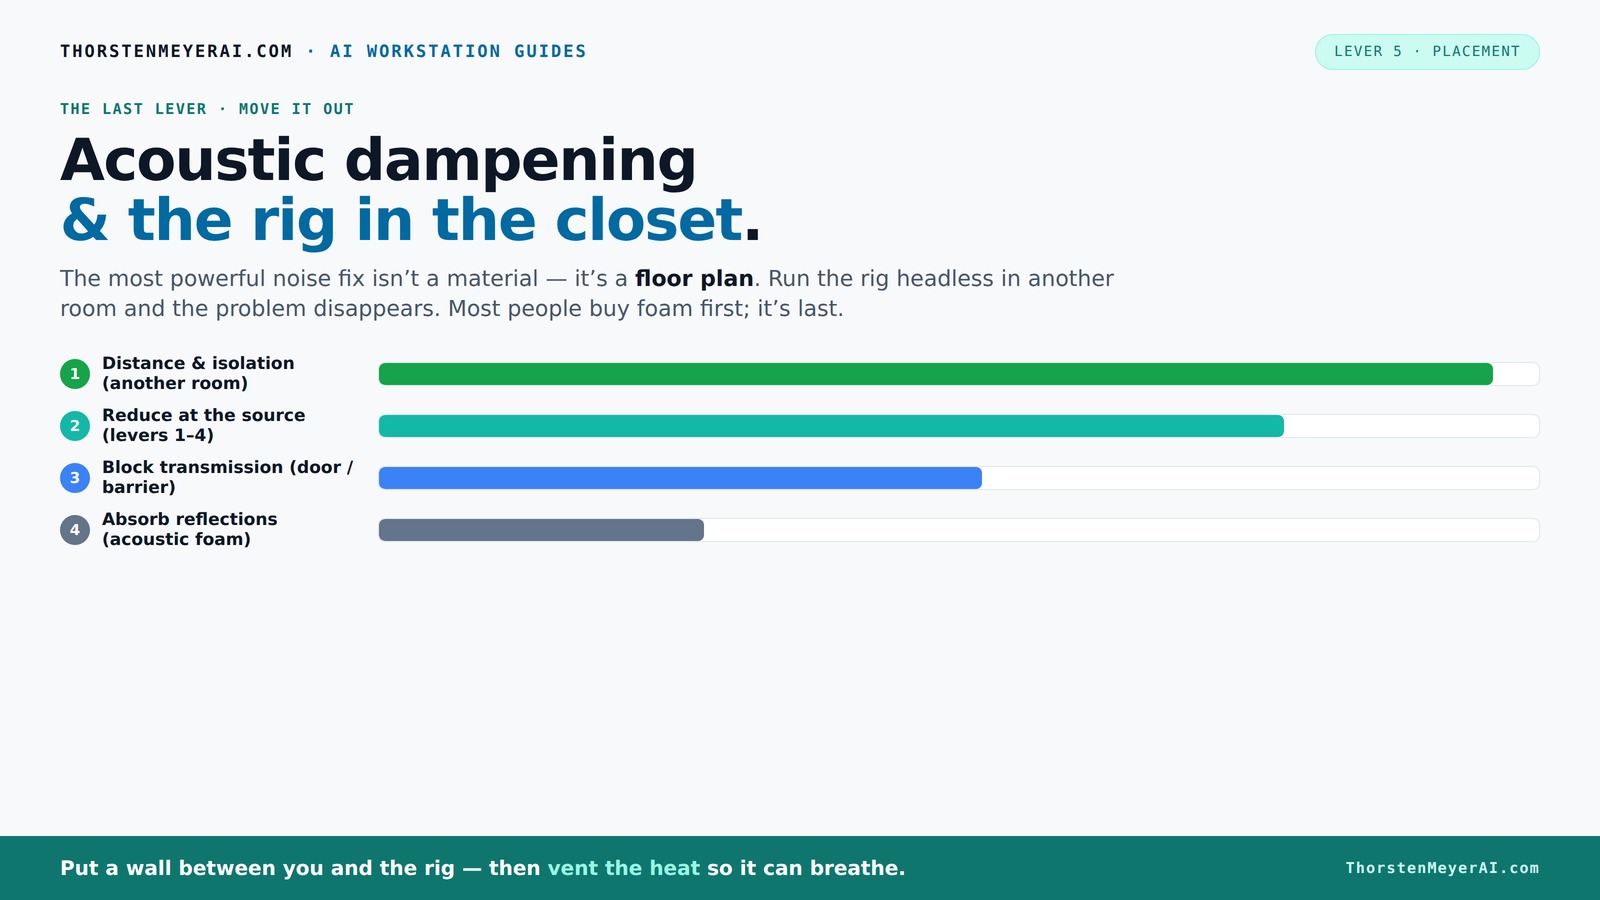
The most powerful noise fix isn’t a material — it’s a floor plan. A rig you can’t hear because it’s in another room beats any amount of foam. Tap the approaches in Part 1 to see what actually works.
(another room)
(levers 1–4)
(door / barrier)
(acoustic foam)
Contain the noise, not the heat
Key Takeaways
- Moving your rig into another room or closet is the most effective way to reduce noise, often more than adding foam or barriers.
- Proper ventilation is critical; sealed spaces trap heat and can damage hardware, so include active airflow solutions.
- Targeted placement of acoustic panels at reflection points improves clarity much more than randomly covering surfaces.
- Bass traps are essential if your voice sounds boomy—install them in corners to absorb low frequencies.
- Seal the closet door thoroughly with weatherstripping and blankets to minimize sound leaks.

TroyStudio Portable Sound Proof Box, 16" x 12" x 16.2" Noise Reduction Enclosure, Light Blocking Quiet Cover, Soundproof Barrier for Ultrasonic Cleaner, Air Pump, Rock Tumbler & Generator
【DIMENSIONS & COMPONENTS】: Exterior dimensions: 16"L x 12"W x 16.2"H; Interior space: 12"L x 8"W x 14.2"H; Foldable...
As an affiliate, we earn on qualifying purchases.
As an affiliate, we earn on qualifying purchases.
Why Distance Is Your Best Weapon Against Noise
Distance is the most effective way to cut noise. Think of your rig as a roaring lion—get it into another room, and suddenly it’s just a distant growl. Moving your setup into a basement, closet, or spare room means you’re reducing the sound waves reaching your ears by more than 80%. It’s like turning down the volume without touching a dial.
For example, I set up my inference rig in a closet on the far side of my basement, connected via fast Ethernet. My workspace on the first floor remains silent, even during intense GPU loads. The noise doesn’t just feel quieter; it *is* quieter, because I’ve put miles of distance between me and the source.
This approach is especially handy for AI workstations, which often generate loud fans and humming GPUs. For more tips on cooling and noise reduction, see this detailed guide on reducing heat and noise in a high-power AI workstation. You don’t need to be next to the machine. Instead, you just need a good network connection and some ventilation planning.

Knightsacoustic 96 Pack Sound Proof Foam Panels for Walls, 1 X 12 X 12 Inches Acoustic Foam Panels, High Density Acoustic Panels Sound Absorbing, Black Noise Cancelling Studio Wedges(NOT Adhesive)
PROFESSIONAL SOUND ABSORBING PROPERTIES – Our acoustic foam panels are expertly designed to reduce noise pollution by absorbing...
As an affiliate, we earn on qualifying purchases.
As an affiliate, we earn on qualifying purchases.
The 'Rig in the Closet' Setup — Why It Works & What to Watch Out For
Placing your rig in a closet or cabinet can be a game-changer for noise. It’s like building a mini soundproof bunker—if you do it right.
But there’s a catch: heat. Trapping a high-power workstation in a sealed space without airflow will turn your closet into a sauna. The GPU and CPU generate hundreds of watts of heat that need to escape, or your hardware will throttle and scream. A sealed closet with no ventilation can cook your machine in just a few hours.
To get this right, you need active airflow: a quiet exhaust fan, vents, or ducting. Think of it like a tiny, dedicated HVAC system for your rig—a small price to pay for peace and safety. Some DIYers use a combination of blankets, foam, and ducting to achieve a balance between noise reduction and cooling. You can also explore this guide on acoustic dampening and setup for more ideas.
For more on cooling options, check out this detailed guide on [reducing heat and noise in a high-power AI workstation](https://thorstenmeyerai.com/reduce-heat-noise-ai-workstation/).

X-Comfot Office Sound Booth with Audio Privacy - Portable Soundproof Booth Includes Black Wood Grain Exterior Design,Movable Room with Light,Fans, Socket for Study,Singing Room (59.06IN)
Reduce Noise: After professional testing, the sound barrier rate of this product is as high as 70%, effectively...
As an affiliate, we earn on qualifying purchases.
As an affiliate, we earn on qualifying purchases.
Acoustic Dampening vs. Soundproofing: Know the Difference
Acoustic dampening and soundproofing are often mistaken as the same, but they serve different purposes. Dampening materials like foam panels and blankets absorb and soften sound reflections inside a space, making it less echoey. They don’t stop noise from passing through walls or doors.
Soundproofing, on the other hand, aims to prevent sound from leaking out or coming in. It involves heavy, dense barriers—like thick drywall, mass-loaded vinyl, or sealed doors. Think of it like adding a wall of concrete versus soft padding.
For example, if your closet echoes loudly when you speak, adding foam panels and bass traps will improve clarity. But if neighbors complain about noise, you need a barrier—like sealing gaps, adding mass to the door, or even building a small soundproof booth inside the closet.
Understanding this distinction helps you prioritize your efforts—dampening is easier and cheaper, but full soundproofing is a bigger project. For comprehensive advice, visit speaks4meonline.net about voice-over techniques and sound treatment.

72in 3-Panel Soundproof Room Divider with Wheels, Heavy-Duty Acoustic Partition Temporary Wall for Noise Reduction, Portable Divider for Home Hospital Library Classroom - Light Grey
【Noise Reduction】Our room divider can absorb at least 85% of the noise, creating a quiet environment without being...
As an affiliate, we earn on qualifying purchases.
As an affiliate, we earn on qualifying purchases.
Where to Place Foam, Panels & Absorbers for the Best Effect
In a tiny closet, strategic placement beats random coverage. The goal is to target the main reflection points—places where sound bounces directly back to your ears or mic.
Start by identifying the key reflection areas: the ceiling, the side walls near your head, and the area behind your mic. For detailed placement strategies, see this article on acoustic treatment placement. Use a mirror trick—sit in your usual spot and have someone move a mirror along the walls. When you see your mic or speaker reflected, that’s where sound bounces back.
Place foam or panels at these spots. For example, a 2-inch thick foam panel on the ceiling and behind your mic can cut down early reflections, making your voice clearer and less boomy. In larger closets, consider adding bass traps at corners to tame low-end buildup, which often causes a muddy sound.
Remember, the goal isn’t to cover every surface—just the spots that matter most. This targeted approach makes a huge difference in clarity and reduces unwanted echo.
Do You Need Bass Traps in a Closet? When & Why
Bass traps are essential if your voice sounds boomy or boxy in a small space. They target the low-frequency standing waves that build up in tiny, parallel-walled rooms.
In a closet, especially one with two parallel walls, bass can become overwhelming. You’ll notice this as a muffled or muddy sound—kind of like talking inside a cardboard box. Installing bass traps in the corners or at the base of the walls helps absorb these low frequencies and clear up your voice.
For example, a podcaster I know added 4-inch thick bass traps in the corners of her closet booth. Her voice went from boomy to crisp, and her recordings gained clarity. The key is thicker, denser material for the low-end. For small spaces, 2-4 inch panels are usually enough.
How Thick Should Your Treatment Be? Size Matters
The thickness of your acoustic panels influences how well they absorb different frequencies. In small closets, 2-inch panels are a good starting point for midrange and high frequencies. For more on treatment options, visit cables-and-networks.com for networking and acoustic setup tips. For lower frequencies, 4-inch panels or bass traps are better.
Imagine trying to stop a truck with a thin blanket versus a heavy curtain. Thicker panels absorb more low-frequency energy—crucial in tight spaces where bass can bounce around endlessly. If your voice sounds hollow or boomy, upgrading to thicker, denser material can make a noticeable difference.
For example, a DIY enthusiast replaced his 2-inch foam with 4-inch panels in key reflection spots and saw a big drop in muddiness. The room felt less 'boxy,' and recordings became clearer.
Dealing with the Closet Door & Openings
The closet door is often the weak link in sound control. It’s usually hollow, with gaps around the edges, and lets noise sneak out or in.
To improve sealing, add weatherstripping, acoustic sealant, or even a heavy blanket hung over the door. For example, I used foam weatherstripping around my closet door, then layered a thick moving blanket on top. The difference in noise leakage was immediate.
For better results, consider installing a solid-core door or a specially designed acoustic door if noise reduction is critical. Also, seal all gaps—around vents, light switches, and cable holes—to close every escape route for sound.
Remember, the door is tricky because it’s often the biggest weak point. A well-sealed door can cut sound transfer by 30-50%.
Can a Closet Setup Work for Voice & Podcasting? Realistic Expectations
Yes, a closet can be an excellent space for vocals, voice-over, or podcasting—if you treat it right. It’s a common DIY solution because closets are small, enclosed, and easy to modify.
But don’t expect perfection. Small rooms tend to produce a dry, sometimes overly dead sound if overtreated. The key is balancing absorption with some reflective surfaces to keep your voice natural. Use soft materials on walls, ceiling, and even on the desk surface.
For example, I recorded a podcast episode in my closet with just a few foam panels, some blankets, and a good mic position. The result was crisp, clear audio with minimal echo. Just be cautious of low-end buildup—adding bass traps helps keep your voice warm without muddiness.
Ventilation & Safety Tips for Your Closet Rig
Ventilation is a must. A hot, poorly ventilated closet will turn your rig into a fire hazard or cause hardware throttling. The goal is to keep airflow flowing without letting noise escape.
Use quiet exhaust fans, ducting, or passive vents—think of it as a mini HVAC system. For example, I installed a small, quiet exhaust fan with ducting that vents outside through a small hole. It keeps the temperature down without introducing noise.
Plan your cable routing and outlets carefully. Use surge protectors and avoid clutter that could block airflow. Always monitor your ambient temperature—if it climbs above 85°F (29°C), it’s time to upgrade your ventilation or move the rig to a better spot.
Frequently Asked Questions
What’s the difference between acoustic dampening and soundproofing?
Acoustic dampening absorbs sound reflections inside a room, reducing echo and reverb. Soundproofing blocks sound from passing through walls or doors, preventing noise from leaking in or out. Dampening makes the space less echoey; soundproofing keeps noise contained.Where should I place foam or panels in a closet booth?
Focus on reflection points: the ceiling, behind your mic, and side walls near your head. Use a mirror trick to identify these spots. Place panels there to cut early reflections, which improves clarity and reduces echo.Do I need bass traps in a closet?
Yes, especially if your voice sounds boomy or muddy. Bass traps in corners absorb low-frequency buildup caused by parallel walls. Installing 4-inch thick traps can make your recordings sound clearer and more natural.How thick should my acoustic treatment be?
Use 2-inch panels for midrange and high frequencies; upgrade to 4-inch or bass traps for low frequencies. Thicker panels absorb more low-end, helping prevent a hollow or muddy sound in small spaces.How do I deal with the closet door?
Seal gaps with weatherstripping, add acoustic sealant, or hang blankets to block sound leaks. For better insulation, consider installing a solid-core door or using a soundproof door if noise reduction is critical.Conclusion
Your closet might just be the best soundproofing tool you have—if you treat it right. Focus on distance, ventilation, and strategic dampening rather than relying solely on foam or sealing doors. Remember, a well-placed rig in a ventilated closet can be silent to your ears but powerful enough for any inference task.
When you think about noise, think about where it’s coming from and where it’s going. Sometimes the simplest fix—moving the machine—outperforms all the fancy gear. Your workspace, your peace, and your hardware will thank you for it.